Convert vhs video tape to mkv file in Linux
Last updated 2019-09-11
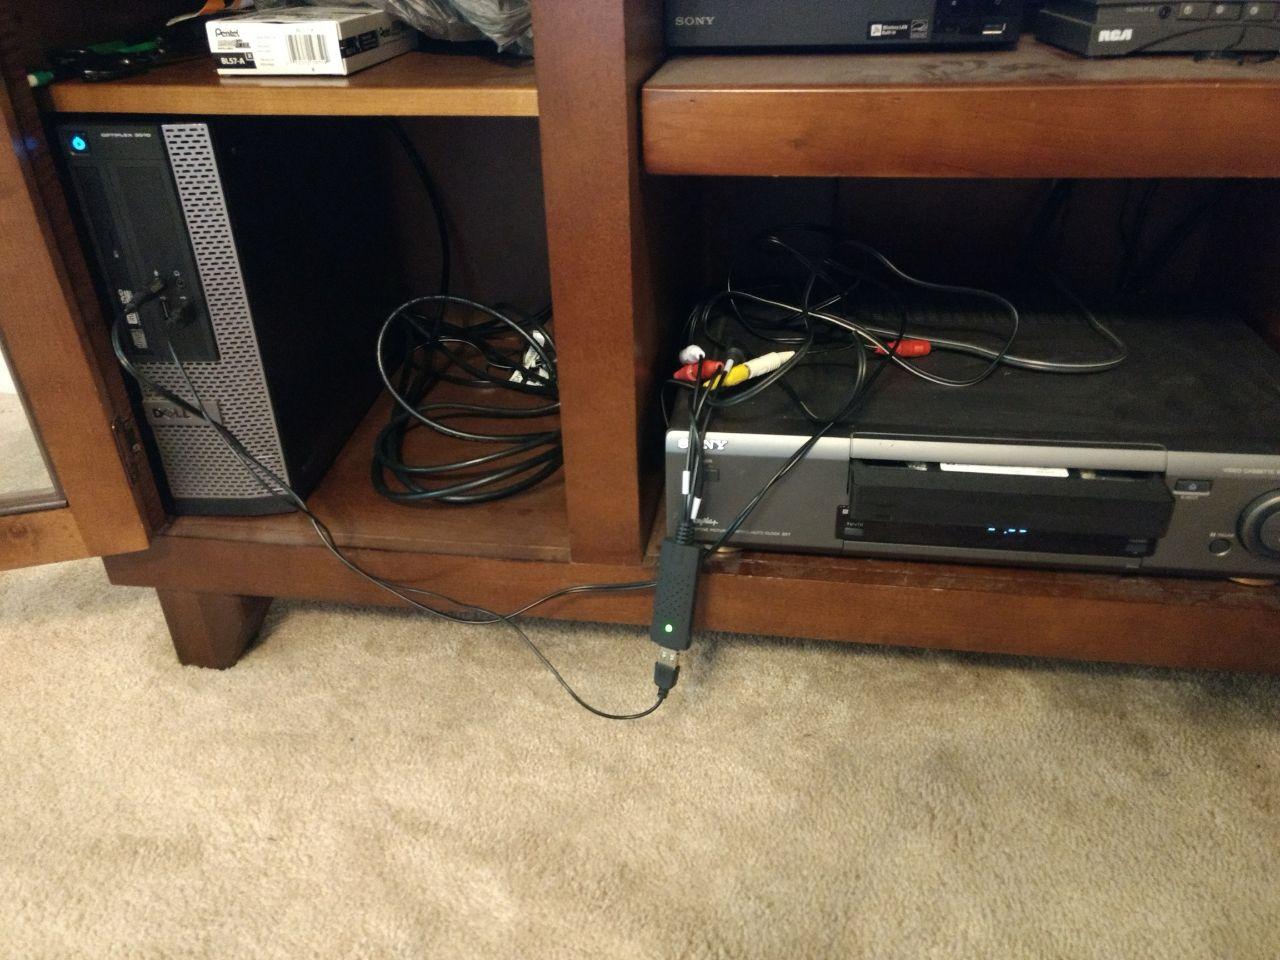
I still own video tapes (VHS) and I have finally gotten around to getting a
nice setup for saving them down to hard disk so I can clear out the old video
tape collection. This is how I did it. First of all, I knew I needed an RCA-
to-something adapter. I found an "AV to USB
converter"
[amazon.com] that does the trick. When attached to a Ubuntu 16.04 system, it
shows up as /dev/video0. No additional steps required! To quote one of my
role models [thealaskalinuxuser.com] on the
Internet: "Linux -- keep it simple." Now, I discovered over time that the
audio input just didn't work. But the video comes in perfectly! I was using
vlc [videolan.org] for the input capture. To
get the audio to work, I had to find an RCA to mini-phono cable which I
already owned. An example product is on
monoprice.com [monoprice.com]. I
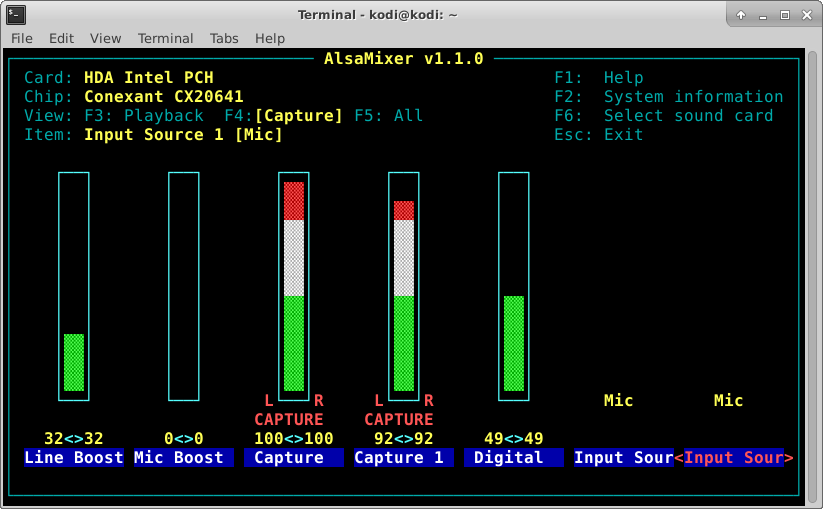
also had to fiddle with the audio input settings to get the input to work
right. I had to poke around with pulseaudio, alsa, and vlc to get the audio
input to work the way I needed it. For my setup (pictured below), I needed to
make sure my input source was mic (the front jack on my desktop computer) and
not line, which is probably the input in the back. I chose to set my mic boost
(akin to gain) really low, and capture volume really high.
 I
needed to set pulseaudio to allow the stereo input. I have discovered that
pulseaudio is fragile, and also never remembers the settings I choose for it,
so for every reboot or login or pulseaudio --start command, I have to go
readjust the "profile." I am starting to understand why people smarter (and
more verbose) than me tend to dislike pulseaudio.
I
needed to set pulseaudio to allow the stereo input. I have discovered that
pulseaudio is fragile, and also never remembers the settings I choose for it,
so for every reboot or login or pulseaudio --start command, I have to go
readjust the "profile." I am starting to understand why people smarter (and
more verbose) than me tend to dislike pulseaudio. 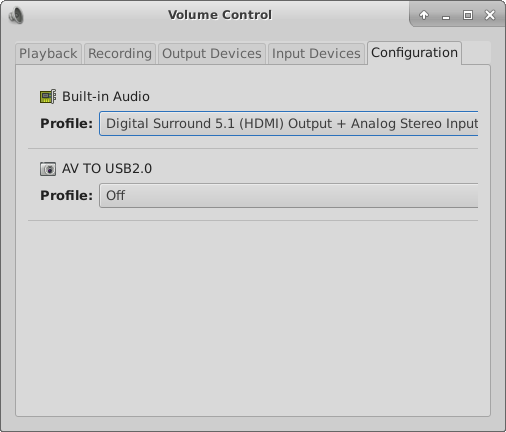 With alsa and pulse set up correctly, it is now a matter of getting vlc to
accept the audio input while accepting the video input. I had to discover how
my system identifies the audio jack.
With alsa and pulse set up correctly, it is now a matter of getting vlc to
accept the audio input while accepting the video input. I had to discover how
my system identifies the audio jack.
$ arecord -l
**** List of CAPTURE Hardware Devices ****
card 0: PCH [HDA Intel PCH], device 0: CX20641 Analog [CX20641 Analog]
  Subdevices: 0/1
  Subdevice #0: subdevice #0
card 0: PCH [HDA Intel PCH], device 2: CX20641 Alt Analog [CX20641 Alt Analog]
  Subdevices: 1/1
  Subdevice #0: subdevice #0
card 1: USB20 [AV TO USB2.0], device 0: USB Audio [USB Audio]
  Subdevices: 1/1
  Subdevice #0: subdevice #0
By trial and error, I learned the mic input is card 0, device 2. In alsa
terms, that's alsa://0,2. So, to put it all together, I had to set VLC to open
a "capture device" of /dev/video0, with audio device of hw:0,2. To get the
audio and video to both be output by VLC, I had to go into advanced optiosn
and se audio input = 0. 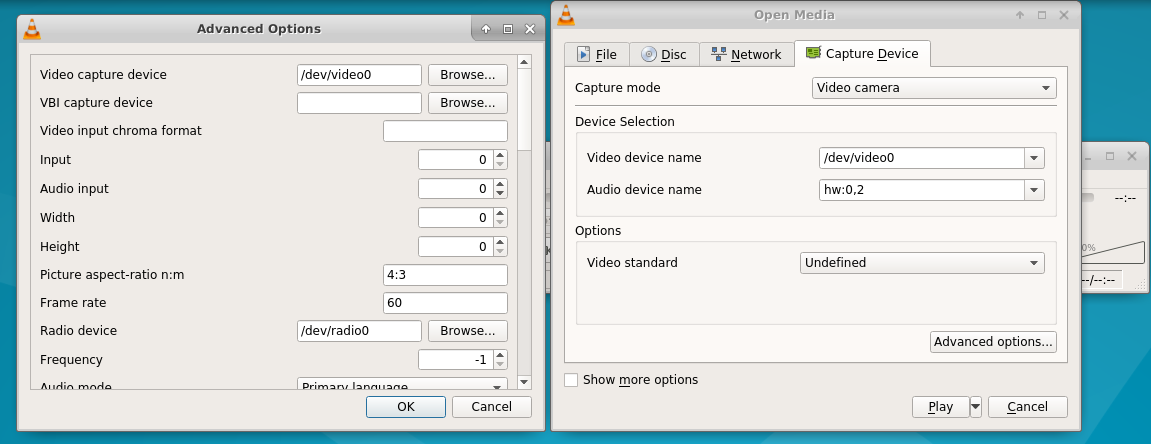 VLC
always defaults to audio input=-1, so no audio will come through. When I
selected the Play button, it presents both audio and video from the VCR! So,
with the video on the screen that I want, I pressed the record button (from
the toolbar visible when you select View -> Advanced controls). VLC records by
default to avi format, which is not my preferred method, even though it is a
temporary format. So, I had to set all the settings again, and then select the
drop-down arrow beside the Play button, and select "Convert." A new window
appears, and I select the file format I want and the output file.
VLC
always defaults to audio input=-1, so no audio will come through. When I
selected the Play button, it presents both audio and video from the VCR! So,
with the video on the screen that I want, I pressed the record button (from
the toolbar visible when you select View -> Advanced controls). VLC records by
default to avi format, which is not my preferred method, even though it is a
temporary format. So, I had to set all the settings again, and then select the
drop-down arrow beside the Play button, and select "Convert." A new window
appears, and I select the file format I want and the output file.
 With
all the options set, I now return to the first options screen and select the
"Convert" button. After running through the whole video, I come back and hit
stop in VLC. I use HandBrake [handbrake.fr] to
convert the file to the format I want. The details of that are beyond the
scope of this post. For a bonus, I discovered that killing vlc safely closes
the written file, so it is still viewable. So I just run a command in a
terminal to kill vlc after the published length of the videotape:
With
all the options set, I now return to the first options screen and select the
"Convert" button. After running through the whole video, I come back and hit
stop in VLC. I use HandBrake [handbrake.fr] to
convert the file to the format I want. The details of that are beyond the
scope of this post. For a bonus, I discovered that killing vlc safely closes
the written file, so it is still viewable. So I just run a command in a
terminal to kill vlc after the published length of the videotape:
$ sleep $(( 60 * 120 )) ; killall vlc
I could have done something fancier with xdotool to select the "stop" button, but why bother?
Addendum
For some reason, when I capture video (possibly because of the NTSC framerate conversation), the audio gets a little bit out of sync with the video. Thankfully, there is a tool that can change the scale of the audio to video: mkvmerge, which is a part of mkvtoolnix suite. After much experimentation, I am satisfied that a safe number to use to scale the audio perfectly from my VCR for all content is in this command:
mkvmerge -y '1:0,100.060552/100' -o new.mkv old.mkv
That is take stream 1 (zero-indexed, and usually the audio in a simple captured video file) and stretch it with an anchor point of zero to 100.060552% of the original speed. So it slows down the audio, and then the audio syncs perfectly with the video, for a 2-hour movie.
Comments