Knowledge Base

Preserving for the future: Shell scripts, AoC, and more

Openssl: Generate CSR with NTDS CA Security Extension

To request a certificate with the exact Microsoft OID for Client Auth certs for the domain, you can use an openssl.cnf that resembles the following.

files/2024/listings/openssl.cnf (Source)

 1
 2
 3
 4
 5
 6
 7
 8
 9
10
11
12
13
14
15
16
17
18
19
20
21
22
23
24
25
26
27
28
29
30
31
32
33
34
35
36
37
38
39
[ req ]
prompt             = no
default_bits       = 4096
default_md         = sha256
default_keyfile    = privkey.pem
distinguished_name = req_distinguished_name
req_extensions     = req_ext

[ req_distinguished_name ]
C = US
ST = Florida
L = Miami
O = Example Org
# Important value
CN = hostname123498.example.org
#emailAddress = noreply@example.org

[ req_ext ]
basicConstraints       = CA:FALSE
keyUsage               = digitalSignature, keyEncipherment
# this oid is szOID_NTDS_CA_SECURITY_EXT
1.3.6.1.4.1.311.25.2   = ASN1:SEQUENCE:NTDSCASecurityExt
subjectAltName         = @alt_names

[ alt_names ]
# Important value
DNS.1 = hostname123498.example.org
DNS.2 = hostname123498.subnet.example.org

[ NTDSCASecurityExt ]
# If you wanted to use another SEQUENCE but that does not conform to the M$ example.
#wrappingSeq = EXPLICIT:0,SEQUENCE:ExtOid
# The EXPLICIT,0 is required to get the specific context which is displayed by asn1parse as: cont [ 0 ]
szOID_NTDS_OBJECTSID = EXPLICIT:0,OID:1.3.6.1.4.1.311.25.2.1
# Important value
key = EXPLICIT:0,OCTETSTRING:S-1-5-21-2059058832-2300889872-1288252972-490382

[ ExtOid ]
oid = OID:1.3.6.1.4.1.311.25.2.1

References

Weblinks

  1. [MS-WCCE]: szOID_NTDS_CA_SECURITY_EXT | Microsoft Learn
  2. x509 - Create own ASN.1 module for custom extension in OpenSSL command line tools - Stack Overflow
  3. /docs/man1.1.1/man3/ASN1_generate_nconf.html
  4. is it possible making openssl skipping the country/common name prompts? - Stack Overflow
Auxiliary

  1. Manually injecting a SID in a certificate – Q&D Security
  2. Generate-ServerCertificate.ps1

Extract attached file from encrypted PDF

I received an email with an attached pdf. This pdf was password-protected (encrypted). Atril thankfully can read those, but I didn't know how to view the file attached to the pdf. (Yes, I know, attached inside an attachment; I wasn't in control of the sender.)

Besides, who wants to use a graphical environment when a cli will do?

qpdf input.pdf output.pdf --decrypt --password='passphrasehere'
mkdir -p outdir
pdftk output.pdf unpack_files output outdir

Old research

My old solution involved pdftk and pdfdetach and for some reason I was failing to read the pdf correctly with pdftk.

pdftk inputfile.pdf input_pw 'passphrasehere' outputfile.pdf
pdfdetach -upw 'passphrasehere' -saveall inputfile.pdf

References

  1. How to Remove a Password from a PDF File in Linux
  2. Open a pdf with blank password with pdftk - Stack Overflow

Unicode cheat sheet for myself

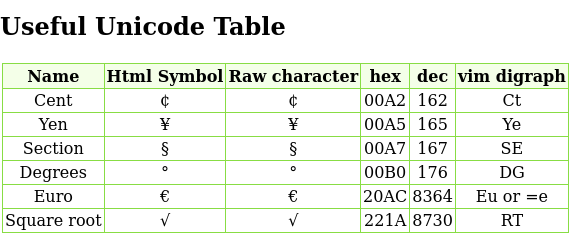
I heavily adapted a unicode chart I found somewhere for my own needs. I show the hexadecimal, decimal, and vim digraph values for some characters I use occasionally. I miss the ALT+157 alt codes, but they were from my old non-free OS days when you didn't want to load up charmap.exe. If I had any environments around like that, I'd bother to add those here too.

<html lang="en">
<head>
<meta http-equiv="Content-Type" content="text/html; charset=us-ascii">
<link rel=stylesheet type="text/css" href="general-info.css">
<meta name="description" content="Lists all Unicode characters">
<meta name="keywords" content="character code">
<style type="text/css">
</style>
<title>Abbreviated Unicode Table</title>
</head>
<body>
<hr class=hf>
<h2>Useful Unicode Table</h2>
<p><table cellspacing=0 cellpadding=2 border=0><tr>
<td>
<table cellspacing=0 cellpadding=2 border=1 bordercolor="#88DD44">
<tr><th>Name</th><th>Html Symbol</th><th>Raw character</th><th>hex</th><th>dec</th><th>vim digraph</th></tr>
<tr><td>Cent</td>       <td>&#x00A2;</td><td>¢</td><td>00A2</td><td>162</td> <td>Ct</td></tr>
<tr><td>Yen</td>        <td>&#x00A5;</td><td>¥</td><td>00A5</td><td>165</td> <td>Ye</td></tr>
<tr><td>Section</td>    <td>&#x00A7;</td><td>§</td><td>00A7</td><td>167</td> <td>SE</td></tr>
<tr><td>Degrees</td>    <td>&#x00B0;</td><td>°</td><td>00B0</td><td>176</td> <td>DG</td></tr>
<tr><td>Euro</td>       <td>&#x20AC;</td><td></td><td>20AC</td><td>8364</td><td>Eu or =e</td></tr>
<tr><td>Square root</td><td>&#x221A;</td><td></td><td>221A</td><td>8730</td><td>RT</td></tr>
</table>
</body>
<footer>
<h4>References</h4>
vim <em>:help digraph</em>
</footer>
</html>

A screenshot of it rendered on my system.

Powershell Use-Culture function

Provided by a coworker, who got it from somewhere on the Internet that I cannot source correctly:

function Use-Culture
{
   param(
      [Parameter(Mandatory)][CultureInfo]$Culture,
      [Parameter(Mandatory)][ScriptBlock]$ScriptBlock
   )
   # Note: In Windows 10, a culture-info object can be created from *any* string.
   #        However, an identifier that does't refer to a *predefined* culture is
   #        reflected in .LCID containing 4096 (0x1000)
   if ($Culture.LCID -eq 4096) { Throw "Unrecognized culture: $($Culture.DisplayName)" }
   # Save the current culture / UI culture values.
   $PrevCultures = [Threading.Thread]::CurrentThread.CurrentCulture, [Threading.Thread]::CurrentThread.CurrentUICulture
   try {
      # (Temporarily) set the culture and UI culture for the current thread.
      [Threading.Thread]::CurrentThread.CurrentCulture = [Threading.Thread]::CurrentThread.CurrentUICulture = $Culture
      # Now invoke the given code.
   & $ScriptBlock
   }
   finally {
      # Restore the previous culture / UI culture values.
      [Threading.Thread]::CurrentThread.CurrentCulture = $PrevCultures[0]
      [Threading.Thread]::CurrentThread.CurrentUICulture = $PrevCultures[1]
   }
}

You would use it in something like this:

Use-Culture -Culture en-US -ScriptBlock { Get-AdUserPasswordExpiration -Identity bgstack15 }

This might have been adapted from Windows PowerShell 2.0 String Localization | Keith Hill's Blog

Automated Devuan CI kickoff process

The Devuan project CI uses gitlab and jenkins (documentation).

To kick off a build of a git repository stored on https://git.devuan.org, you just make an issue with the label of the correct suite (unstable/experimental), and assigned to Releasebot. Oh, you also need a branch of code named suites/unstable, and a tag of upstream/1.32.0 where 1.32.0 is the upstream release version. Sometimes Debian doesn't actually store those, so you have to make those yourself.

files/2024/listings/make-issue.sh (Source)

 1
 2
 3
 4
 5
 6
 7
 8
 9
10
11
12
13
14
15
16
17
18
19
20
21
22
23
24
25
26
27
28
29
30
31
32
33
34
35
36
37
38
39
40
41
42
43
44
45
46
47
48
49
50
51
52
53
54
55
56
57
58
59
60
#!/bin/sh
# File: make-issue.sh
# Location: /mnt/public/work/git.devuan.org
# Author: bgstack15
# Startdate: 2024-07-02-3 10:26
# Title: Begin Build of Package in Devuan CI
# Purpose: make a oneliner to submit a build task for a project I maintain in Devuan
# History:
# Usage:
#    ./make-issue.sh lightdm
# Reference:
#    https://docs.gitea.com/api/1.20/#tag/organization/operation/orgGetLabel
#    https://demo.gitea.com/api/swagger#/issue/issueCreateIssue
#    https://docs.gitea.com/developers/api-usage
# Improve:
# Dependencies:
#    devuan-req: curl, jq

TOKEN="$( cat /mnt/public/packages/git.devuan.org-token )"
SUITE="${SUITE:-unstable}"
GITEAURL="${GITEAURL:-https://git.devuan.org}"
REPO="${REPO:-${1}}"

main() {
   # input: SUITE, TOKEN, REPO
   # Purpose: print the build job url, e.g, https://jenkins.devuan.dev/job/devuan-package-builder/2015
   # get label id of suite we want to use.
   test -z "${REPO}" && { echo "Fatal! Must set REPO. Aborted." ; return 1 ; }
   response="$( curl --silent "${GITEAURL%%/}/api/v1/orgs/devuan/labels" )"
   label_id="$( echo "${response}" | jq ".[] | select(.name == \"${SUITE}\").id" )"
   response="$( curl --silent "${GITEAURL%%/}/api/v1/repos/devuan/${REPO}/issues" -X POST -H "Accept: application/json" -H "Authorization: token ${TOKEN}" -H "Content-Type: application/json" --data-raw \
      "{\"description\":\"\",\"labels\":[${label_id}],\"title\":\"build\",\"assignees\":[\"releasebot\"]}"
   )"
   issue="$( echo "${response}" | jq '.number' )"
   sleep 8 # to give releasebot time to add its comment
   response="$( curl --silent "${GITEAURL%%/}/api/v1/repos/devuan/${REPO}/issues/${issue}/comments" -X GET -H "Accept: application/json" -H "Authorization: token ${TOKEN}" )"
   buildjob="$( echo "${response}" | jq --raw-output '.[] | select(.user.login = "ReleaseBot") | select(.body | startswith("Triggered")).body' | sed -r -e 's/^.*(https?)/\1/;' )"
   echo "${buildjob}"
}

# check if dot-sourced:
# Ref: https://stackoverflow.com/questions/2683279/how-to-detect-if-a-script-is-being-sourced/28776166#28776166
sourced=0
if [ -n "$ZSH_VERSION" ]; then 
  case $ZSH_EVAL_CONTEXT in *:file) sourced=1;; esac
elif [ -n "$KSH_VERSION" ]; then
  [ "$(cd -- "$(dirname -- "$0")" && pwd -P)/$(basename -- "$0")" != "$(cd -- "$(dirname -- "${.sh.file}")" && pwd -P)/$(basename -- "${.sh.file}")" ] && sourced=1
elif [ -n "$BASH_VERSION" ]; then
  (return 0 2>/dev/null) && sourced=1 
else # All other shells: examine $0 for known shell binary filenames.
     # Detects `sh` and `dash`; add additional shell filenames as needed.
  case ${0##*/} in sh|-sh|dash|-dash) sourced=1;; esac
fi

# if not dot-sourced:
if test $sourced -eq 0 ;
then
   test -z "${REPO}" && { echo "Fatal! Must set REPO. Aborted." ; exit 1 ; }
   main
fi

So now I don't have to manually navigate to do this every time. I just fix the repo with branches and tags, and then run this script. I love this modern API world! It's a shame it comes with some opinionated tech and companies that own tech that use it in ways against people. Tech doesn't have to be horrible. It can be great, like this!

Android and my printer

Default Print Service

For the built-in Android Default Print Service, omit the protocol.

print.ipa.example.com:631/printers/ml1865w

CUPS Printing

To use CUPS Printing with my printer, use this url:

https://print.ipa.example.com:631/printers/ml1865w

It complained about the untrusted cert, which suggests that CUPS Printing does not rely on the user-added certificates.

Alternative research

I researched, and unfortunately this fix for this app is not eough.

Perhaps the application needs to update the network_security_config.xml to include <certificates src="user" /> like F-droid itself needed

<?xml version="1.0" encoding="utf-8"?>
<network-security-config>
    <base-config cleartextTrafficPermitted="true">
        <trust-anchors>
            \<!-- Trust preinstalled CAs --\>
            <certificates src="system" />
            \<!-- Additionally trust user added CAs --\>
            <certificates src="user" />
        </trust-anchors>
    </base-config>

Troubleshooting problem in Infcloud, my web calendar solution

I've written about my web calendar solution. Over time I've noticed that my web calendar malfunctions and doesn't always hide/display my calendars when I check and uncheck the box.

I spent a bunch of time debugging this, and learned that it might be a commit where I forcefully set a variable at login time in commit d9ddf89b32a1514248f0943e72f704a8bcb523e4 to file webdav_protocol.js.

@@ -747,6 +772,8 @@ function netFindResource(inputResource, inputResourceIndex, forceLoad, indexR, l
                    if(globalSettings.activecalendarcollections.value.length>0 && globalVisibleCalDAVCollections.length==0)
                        globalDefaultCalendarCollectionActiveAll=true;
                }
+               // stackrpms,2 This forces all calendars to turn on at initial load
+               globalDefaultCalendarCollectionActiveAll=true;

                if(globalDefaultCalendarCollectionActiveAll)
                    for(var i=0; i<globalResourceCalDAVList.collections.length; i++)

I think even if a calendar is off, but I set that value to true, it misleads the variable globalVisibleCalDAVCollections. I found that using the java console to reset that value makes this work better.

globalVisibleCalDAVCollections=[]

So I haven't made any changes to the code, at this time. By just resetting that array with 5,445 entries (of the 11 calendars I have in production), my web calendar started behaving better.

add chapter titles to mkv automatically

Here's an old one I haven't used in years apparently, because the shebang was /bin/sh but it requires bash, so from my Fedora desktop days.

files/2024/listings/chapter-titles.sh (Source)

 1
 2
 3
 4
 5
 6
 7
 8
 9
10
11
12
13
14
15
16
17
18
19
20
21
22
23
24
25
26
27
28
29
#!/bin/bash
# utility to simplify entering chapter titles into MKVToolNix GUI
# startdate: 2019-04-07 20:26
# dependencies:
#    INFILE needs one line per chapter. Each line is the exact contents of the chapter title.
#    xdotool

test -z "${INFILE}" && INFILE=/mnt/public/Video/chapters.txt
test -n "${1}" && INFILE="${1}"

echo "Using INFILE=${INFILE} with chapter titles:"
head -n3 "${INFILE}"
printf "%s\n" "..."
tail -n3 "${INFILE}"
echo "Press enter to start the 5-second countdown, and then move the cursor to the MKVToolNix window and Name field."
read foo
sleep 5

x=0
while read -u10 line ;
do
   # in case you want to count them
   x=$(( x + 1 ))
   echo "line=${line}"
   xdotool type --delay 12ms "${line}"
   xdotool key --delay 12ms "Return" "Return"
done 10< "${INFILE}"

echo "done!"

So while it's kind of a oneliner, you have to prepare your input file with the chapter names. That is left as an exercise for the reader.

To use this, you have to have the input file prepared, and you have to be running mkvtoolnix-gui already. (I never learned how to do with with mkvtoolnix cli which probably renders this whole script moot.) Open your mkv file on the chapter tab. Then in a nearby terminal, run:

chapter-titles.sh ~/chapters.txt

It will tell you to press enter, and then you have 5 seconds to position the cursor at the chapter 1 Name field.

Ironic that I go to all this effort, but only one of my video players (vlc, and not mpv or Jellyfin) seems to show chapter titles so why do I bother? Maybe that's why I haven't touched this script in 5 years. I got the itch to add all the metadata things to a file and got carried away, and was pleasantly surprised to learn I needed to describe it here!

Oneliner for installing network printer

After reinstalling my CentOS 7 print server with Rocky Linux 9, I realized I had changed the name of my cups printer. SO I had to reconfigure it on all my print clients.

#!/bin/sh
sudo lpadmin -D 'Samsung ML-1865w' -L "computer room" -p 'ml1865w' -E -v ipp://print.ipa.example.com:631/printers/ml1865w -m everywhere
sudo lpadmin -d 'ml1865w'