Knowledge Base

Preserving for the future: Shell scripts, AoC, and more

PhotoprismPull library for python

In my efforts to de-google my life, I have established a Photoprism instance. It has a great third-party tool that helps build the same albums on Photoprism that I had in Google Photos.

I used to use images from Google Photos album as screensaver on Linux but now I am using PhotoPrism so I had to develop a new solution.

My goals include showing only the most recent photos (60 days in my case), and thankfully the Photoprism API endpoint for searching for images allows you to filter with "after {date}"! In fact, the logic for pulling the time range from Photoprism is easier than from Google Photos!

I wrote a whole python library and simple front end to accomplish my shell script which pulls the named albums' recent images.

README for photoprismpull

This is a basic python lib for interacting with the API of a PhotoPrism instance.

Upstream

This project's upstream is at https://bgstack15.ddns.net/cgit/photoprismpull and https://gitlab.com/bgstack15/photoprismpull.

Alternatives

A library written in Go is advertised by Photoprism.

Related

For a shell interaction with the API to trigger imports, see https://bgstack15.ddns.net/cgit/photoprism-autoimport/.

For a script to create albums from a Google Photos Takeout in PhotoPrism see https://github.com/inthreedee/photoprism-transfer-album.

Reason for existing

I do not know Go, but I am comfortable in python. My two original goals for this library were:

  • Download album to directory (with optional limitation such as "only the last 60 days"
  • Add photos to album based on sha1sums

Using

There is a small front-end, pp.py. Run its --help option.

I tend to use this library in an interactive python shell. One task included fetching a Google Photos album as a zip, extracting, and generating a sha1sums file. I had used that related photoprism-transfer-album tool, but my Takeout failed to include a few albums for no reason. Since I already had all the photos in PhotoPrism, I just needed to find them and add them to the correct album.

sha1sum -- * > input.album5

And then in a python shell:

import importlib, pplib
# as needed after changes:
importlib.reload(pplib)
a = pplib.get_session("https://pp.example.com","admin","password")
c = add_hashes_to_album(a, "Pretty Album Name", "/mnt/public/Images/photoprism/Named albums/Pretty Album Name/input.album5",apply=True)

The simpler example is downloading an album to a subdirectory.

import pplib
a = pplib.get_session("https://pp.example.com","admin","password")
c = download_album_to_directory("Pretty Album Name",directory="/mnt/public/Images/photoprism",extraparams="&after=2020-02-08",session=a)

This will make a new directory, /mnt/public/Images/photoprism/Pretty Album Name/ and populate it with the images from this named album in PhotoPrism. Note that the get_album_by_title() function explicitly excludes "albums" autogenerated from existing directories in your originals directory. It only searches through actual "album" albums. This is trivial to change for yourself as needed.

file get-albums.sh

#!/bin/sh
# File: get-albums.sh
# Location: extra/
# Author: bgstack15
# Startdate: 2022-07-07 13:50
# Title: Demo for getting albums
# Purpose: Download albums easily, but only keep the past so many days
# History:
# Usage:
#    adjust variables at top, and album names looped at the bottom.
# Reference:
# Improve:
#    switch to bash, and put the list of album names in the top part with the other variables?
# Dependencies:
# Documentation: see README.md for project
OUTDIR=/mnt/public/pictures
SCRIPT=./pp.py
USERNAME=admin
PWFILE=pwfile
URL=http://server4:2342
get_album(){
   # Goal: get photos from this named album, and keep only ones from under $DAYS days ago.
   # call: get_album "${TOPDIR}" "${NAME}" "${DAYS}"
   _dir="${1}"
   _name="${2}"
   _days="${3}"
   when="$( date -d "-${_days} days" "+%F" )"
   test -d "${_dir}/${_name}" && find "${_dir}/${_name}" -mindepth 1 ! -type d -mtime "+${_days}" -delete
   "${SCRIPT}" --url "${URL}" --password "${PWFILE}" --username "${USERNAME}" -a "${_name}" --extra "&after=${when}" --directory "${_dir}"
}
for album in "Pretty Name 1" "Family Memories 2020-2025" ;
do
   get_album "${OUTDIR}" "${album}" "60"
done

The file is that simple! There are so many more parameters you can pass to SearchPhotos. I only needed "after."
Docker-jitsi-meet with custom settings

I spent some time trying to configure my self-hosted Jitsi Meet based on the documentation that says to make a custom-interface_config.js and custom-config.js for the volume that gets mounted as /config in the container. If you follow the instructions, that would be path ~/.jitsi-meet-cfg/web.

Unfortunately, the container does not actually process these files, so I had to develop my own way to inject my settings and branding into the application.

Part of the instructions for deploying involve getting the release tarball and extracting it (as opposed to cloning the git repo). Inside this tarball is the docker-compose.yml and the web/ directory for that Dockerfile. I had to modify this web/Dockerfile, by adding a new layer:

RUN ln -sf /custom/watermark.svg /usr/share/jitsi-meet/images/watermark.svg && \
ln -sf /custom/interface_config.js /defaults/interface_config.js && \
ln -sf /custom/config.js /defaults/config.js

I put this at the bottom, below the RUN declaration. Then, I built this new image and recorded the name of the image, e.g., 3129533498de.

~/jitsi-7439-2/web$ docker build .

And then update the docker-compose.yml to use this image for target web: and add the volume.

services:
    # Frontend
    web:    
        #image: jitsi/web:${JITSI_IMAGE_VERSION:-stable-7439-2}
        image: 3129533498de
        restart: ${RESTART_POLICY:-unless-stopped}
        ports:
            - '${HTTP_PORT}:80'
            - '${HTTPS_PORT}:443'
        volumes:
            - ${CONFIG}/web:/config:Z
            - ${CONFIG}/web/crontabs:/var/spool/cron/crontabs:Z
            - ${CONFIG}/transcripts:/usr/share/jitsi-meet/transcripts:Z
            - /home/jitsi/.jitsi-meet-cfg/custom:/custom:Z

And then of course make my ~/.jitsi-meet-cfg/custom directory.

~/.jitsi-meet-cfg/custom$ ls
config.js  interface_config.js  watermark.svg

I copied these javascript files from web/rootfs/defaults/ and modified them to suit my needs, and also I generated my own watermark.svg.

Upon preparing these files, I was able to then bring docker-compose up.

docker-compose up -d

And now my Jitsi Meet has my settings! That was way harder than it should have been, but the application was not acting as documented.

Pyjstest: view gamepad input with python

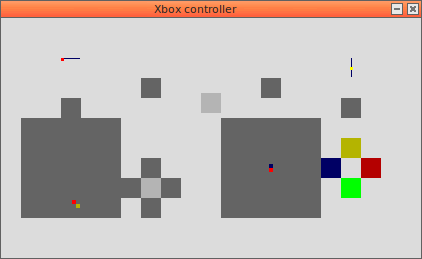
I recently got the urge to connect my old USB gamepads and play retro games with them. (Specifically, Jazz Jackrabbit 2 if you care). I spent a week whipping up a small GUI interface to do that.

Dependencies

On Devuan-like systems use packages:

  • python3-sdl2
  • python3-pygame

How to use

You may attach the USB gamepad before or after running this program. For best results, do not connect multiple gamepads at a time.

Add new configs to config.py, with a simple declarative syntax that is documented briefly with the two given examples. Feel free to share additional configs with this upstream. Gather aliases for attached gamepads with the helper files in directory extras/.

Upstream

The upstream for the project is at https://bgstack15.ddns.net/cgit/pyjstest/ or https://gitlab.com/bgstack15/pyjstest/.

Reason for existence

I wanted to build a simple input-reaction program, and test my python skills, and learn some sdl2. SDL2 has python3 bindings available, but most of the documentation on the Internet is for the C library.

Alternatives

For basic input display on cli and gtk displays, use these utilities.

  • jstest
  • jstest-gtk

Improvements

I need to redesign this to handle multiple attached devices. Right now, it supports only one.

Disable gamepad input as mouse input

I added an answer to AskUbuntu, based on a different answer. Here is a small function that easily enables/disables using the features provided by package xserver-xorg-input-joystick.

jsinput() {
    # Insert your controller name here, as seen from `xinput --list`.
    _c="$( xinput --list --id-only 'Logic3 Controller' )"
    # Default is off, unless you pass "yes" or similar as first parameter.
    _mode="0" ; echo "${1}" | grep -qiE '\<(yes|1|y|on)\>' && _mode=1
    # Find ids of these property names, and then tell each one to go to the mode chosen in the previous line.
    xinput list-props "${_c}" | sed -n -r -e '/Generate (Mouse|Key)/{s/.*\(([0-9]+)\).*/\1/;p}' | xargs -I@ xinput set-prop "${_c}" @ "${_mode}"
}

If you stick this in your ~/.bashrc you could then run jsinput to disable this controller as mouse input. To turn on mouse input you could then simply run jsinput 1 or jsinput on.

Modify postfix for webhook plugin for Jellyfin

With the recent Gmail change that requires oauth2 for sending authenticated gmail (covered in Postfix use oauth2 for gmail), my jellyfin Webhook plugin that includes an smtp option has finally stopped working.

First of all, I had to ensure that I had network connectivity to my smtp server which is available over my wireguard connection.

nc server2.ipa.internal.com 25
Ncat: Connection refused.

So I had to modify the nftables rules on server2. That took me a while, but I finally got it. For a real-time modification, I used this command.

sudo nft add rule 'inet filter' input position 4 iif wg0 accept

This rule means "for input interface wg0 [wireguard], accept all packets." And insert this rule in a certain position, and not just at the end (so after the infamous "DROP ALL" of a well-behaved firewall.

And my full ruleset is now in /etc/nftables.conf.

flush ruleset

table inet filter {
   chain input {
      type filter hook input priority 0;
      # accept any localhost traffic
      iif lo accept
      iif wg0 accept comment "trust all wireguard traffic"
      # accept traffic that originated from this system

      # accept traffic originated from us
      ct state established,related accept

      # this {} array is comma-separated
      tcp dport { 22 } ct state new accept

      # count and drop any other traffic
      counter drop
   }
   chain forward {
      type filter hook forward priority 0;
   }
   chain output {
      type filter hook output priority 0;
   }
}

So finally my netcat worked.

$ nc server2.ipa.internal.com 25
220 server2.ipa.internal.com ESMTP Postfix (Debian/GNU)

So when I trigger a notification in Jellyfin, I get this error.

Jun 26 18:27:50 server2 postfix/smtpd[14319]: connect from server1.remote.internal.com[10.198.0.14] Jun 26 18:27:50 server2 postfix/smtpd[14319]: warning: TLS library problem: error:0A000126:SSL routines::unexpected eof while reading:../ssl/record/rec_layer_s3.c:308: Jun 26 18:27:50 server2 postfix/smtpd[14319]: lost connection after STARTTLS from server1.remote.internal.com[10.198.0.14] Jun 26 18:27:50 server2 postfix/smtpd[14319]: disconnect from server1.remote.internal.com[10.198.0.14] ehlo=1 starttls=1 commands=2

Researching on the Internet for "jellyfin webhook smtp starttls" led to information mostly about disabling starttls. I didn't even realize I had it enabled. So I made some changes to my postfix to disable the silly snakeoil TLS certificate.

And then I logged in again, and got this message in my postfix logs! So this is progress.

Jun 26 18:34:49 server2 postfix/smtpd[15802]: NOQUEUE: reject: RCPT from server1.remote.internal.com[10.198.0.14]: 454 4.7.1 <example@gmail.com>: Relay access denied; from=<example@gmail.com> to=<example@gmail.com> proto=ESMTP helo=<[192.168.58.18]>
Jun 26 18:34:49 server2 postfix/smtpd[15802]: lost connection after RSET from server1.remote.internal.com[10.198.0.14]
Jun 26 18:34:49 server2 postfix/smtpd[15802]: disconnect from server1.remote.internal.com[10.198.0.14] ehlo=1 mail=1 rcpt=0/1 rset=1 commands=3/4

After all the changes, my postfix main.cf includes at least these lines:

# Important to comment these out!
#smtpd_tls_cert_file=/etc/ssl/certs/ssl-cert-snakeoil.pem
#smtpd_tls_key_file=/etc/ssl/private/ssl-cert-snakeoil.key
#smtpd_tls_security_level=may
smtpd_use_tls=no
# This already existed, but...
smtpd_relay_restrictions = permit_mynetworks permit_sasl_authenticated defer_unauth_destination
# I added my wireguard subnet here.
mynetworks = 127.0.0.0/8 [::ffff:127.0.0.0]/104 [::1]/128 10.198.0.0/24

And now I can receive notifications when my users visit my Jellyfin server.

And just for completeness's sake, here is my smtp notification information.

Add smtp destination.
Name: smtp2
Webhook Url: (not relevant) https://www.example.com/internal/jellyfin-webhook2.html
Items: playback start, playback stop, session start
User filter: (all users)
Item time: (all)
Send all properties: no
Template:
<pre>Username: {{Username}}
Action: {{NotificationType}}
Timestamp: {{UtcTimestamp}}
Title:: {{Name}}
{{#if_exist SeriesName}}
Series: {{SeriesName}}
Season: {{SeasonNumber00}}
Episode: {{EpisodeNumber00}}
{{/if_exist}}
DeviceName: {{DeviceName}}
ClientName: {{ClientName}}
PlaybackPosition: {{PlaybackPosition}}
</pre>
END TEMPLATE CONTENTS
Sender: example@gmail.com
Receiver: example@gmail.com
smtp server address: server2.ipa.internal.com
smtp port: 25
Use credentials: no
Use ssl: no
Is html body: yes
Subject template: Jellyfin activity for {{Username}}
Update 2022-07-12:

I have since learned that the nftables.conf contents should NOT have double-quotes around the wg0 interface name. The output of nft list table 'inet filter' shows double-quotes, but these do not work when placed in the rules file.

Fixing gamepad for Wine game

I finally got fed up with Wine's malfunction quite a few months ago about it passing my gamepads to Jazz Jackrabbit 2. For some reason, after a software update, the controllers did not work correctly.

Today, I spent a bunch of time researching how to adjust the mapping of the gamepads. I found a great tool which helped write custom SDL gamepad mapping strings, SDL2 Gamepad Tool by General Arcade. It is an interactive mapping tool where it guides you to press each button on your controller and it generates the right string.

Solution

I never got that string to work correctly with Wine, but I ended up solving my problem by adjusting the Wine registry. I ended up merely setting the key

HKLM\System\CurrentControlSet\Services\WineBus\Map Controllers (REG_DWORD) = 0x0

The relevant snippet from that link.

+->Map Controllers [DWORD value (REG_DWORD): Enable (0x1, default) or disable (0x0) conversion from SDL controllers to XInput-compatible gamepads. Only applies to SDL backend.]

And then, all my buttons worked, and my two-axis dpad worked!

Additional research

I spent quite a while trying to customize the mappings, which didn't seem to stick when I tried them in the Wine registry in a few places.

HKCU\Software\Wine\DirectInput\"Tomee USB SNES Controller" = "X,Y"


HKLM\System\CurrentControlSet\Services\WineBus\Map\"auniquename" = "03000000bd12000015d0000010010000,Tomee SNES USB Controller,platform:Linux,a:b2,b:b1,x:b3,y:b0,back:b8,start:b9,leftshoulder:b4,rightshoulder:b5,dpup:-a1,dpdown:+a1,dpleft:-a0,dpright:+a0,"

I'm pretty sure Wine doesn't honor the environment variable SDL_GAMECONTROLLERCONFIG, because it wants to use the Registry key above, which actually I never got it to work.

I wrote a little C program by adapting a large number of examples, mostly from the SDL2 documentation.

// File: js1.c
// Startdate: 2022-06-29
// Purpose: Test my C skills, while trying to test SDL2 game controller stuff
// References:
// http://www.libsdl.org/release/SDL-1.2.15/docs/html/guideinput.html
// https://wiki.libsdl.org/SDL_GameControllerMapping
// https://stackoverflow.com/q/29589982
// https://generalarcade.com/gamepadtool/
// https://wiki.winehq.org/Useful_Registry_Keys
// https://wiki.archlinux.org/title/Gamepad
// https://stackoverflow.com/questions/29589982/does-sdl-on-linux-support-more-than-one-gamepad-joystick
// Dependencies:
//    sudo apt-get install libsdl2-dev
// Documentation:
// try SDL_GAMECONTROLLERCONFIG env var.
#include "SDL2/SDL.h"
SDL_Joystick *joy;
SDL_GameController *ctrl;
char *guid[33];
char *mapping;
const char *newmapping = "03000000bd12000015d0000010010000,Tomee SNES USB Controller,platform:Linux,a:b2,b:b1,x:b3,y:b0,back:b8,start:b9,leftshoulder:b4,rightshoulder:b5,dpup:-a1,dpdown:+a1,dpleft:-a0,dpright:+a0,";
int main () {
   if (SDL_Init( SDL_INIT_VIDEO | SDL_INIT_JOYSTICK ) < 0)
   {
      fprintf(stderr, "Couldn't initialize SDL: %s\n", SDL_GetError());
      exit(1);
   }
   SDL_InitSubSystem(SDL_INIT_JOYSTICK);
   SDL_InitSubSystem(SDL_INIT_GAMECONTROLLER);
   printf("%i joysticks were found.\n\n", SDL_NumJoysticks() );
   printf("The names of the joysticks are:\n");
   for( int i=0; i < SDL_NumJoysticks(); i++ )
   {
      joy = SDL_JoystickOpen(i);
        if (joy) {
            printf("Opened joystick #%d \"%s\"\n", i, SDL_JoystickNameForIndex(i));
            printf("Axes count: %d\n", SDL_JoystickNumAxes(joy));
            printf("Button count: %d\n", SDL_JoystickNumButtons(joy));
            printf("Ball count: %d\n", SDL_JoystickNumBalls(joy));
            SDL_JoystickGetGUIDString(SDL_JoystickGetGUID(joy),*guid,sizeof(guid));
            printf("GUID string: \"%s\"\n",guid);
            if (SDL_IsGameController(i)) {
                ctrl = SDL_GameControllerOpen(i);
                mapping = SDL_GameControllerMapping(ctrl);
                printf("Mapping: \"%s\"\n", mapping);
                SDL_free(mapping);
                printf("Trying new mapping.\n");
                int r = SDL_GameControllerAddMapping(newmapping);
                printf("Result: %d.\n", r);
            }
        }
   }
   return 0;
}

And a makefile to make it faster to build.

CC=gcc
SRC = $(wildcard *.c)
OBJS = $(patsubst %.c, %.o, $(SRC))
NAME = js1

all: $(NAME)
.PHONY: clean

$(NAME): $(OBJS)
    $(CC) $(shell pkg-config --cflags sdl2 ) $< $(shell pkg-config --libs sdl2 ) -o $@

clean:
    rm -f $(OBJS) $(NAME)

Running Jitsi Meet on a virtual directory

It is possible to configure Jitsi Meet to use a subdirectory, so that you can use https://www.example.com/jitsi/ but it breaks the Jitsi mobile app. If the entire user base uses desktop-based web browsers, a virtual directory is feasible.

Select a virtual directory. I used /jitsi/.

Modify Meet server

Modify file web/Dockerfile to have a second RUN statement:

RUN printf '%s\n' '<base href="/jitsi/" />' > /usr/share/jitsi-meet/base.html && \
    sed -i -r -e '/#include virtual/{s/"\//"/;};' /usr/share/jitsi-meet/index.html

Build this image with docker build . when running from inside that web/ directory. Record the image name or id number. Modify docker-compose.yml to use this new image id for service web, e.g.:

services:
    # Frontend
    web:
        image: e16e8216e37b

Modify attribute PUBLIC_URL in file .env:

PUBLIC_URL=https://www.example.com/jitsi/

An optional step, which supports the legacy http-bind method instead of the current websocket method, is to prepare file ~/.jitsi-meet-cfg/web/config.js by extracting it from a running web instance and modifying it in the following manner.

sed -i -r -e '/bosh:/{s/\/http-bind/\/jitsi\/http-bind/;};' /config/config.js

The file will then resemble included file config.js.subdir.example.

Restart docker-compose.

cd ~/docker-jitsi-meet-stable-7287
docker-compose down
docker-compose up -d

Modify httpd server

In my public https virtual host, add the directives for this Jitsi meet instance.

<VirtualHost *:443>
   ServerName www.example.com
   ServerAlias www.ipa.internal.com www.internal.com
   DocumentRoot /var/www/external
   Include conf.d/ssl-common.cnf
   Include conf.d/ssl-443.cnf
   ProxyPreserveHost On
   # Below here is for Jitsi Meet
   <IfModule mod_proxy.c>
      <IfModule mod_proxy_wstunnel.c>
         ProxyTimeout 900
         <Location "/jitsi/xmpp-websocket">
            ProxyPass "ws://server4:8000/xmpp-websocket"
         </Location>
         <Location "/jitsi/colibri-ws/">
            ProxyPass "ws://server4:8000/colibri-ws/"
         </Location>
      </IfModule>
   </IfModule>
   Proxypass         /jitsi/     http://server4:8000/
   ProxypassReverse  /jitsi/     http://server4:8000/
</VirtualHost>

Reload httpd. The virtual directory should now work on desktop browsers.

Files involved

  • server4:/home/jitsi/docker-jitsi-meet-stable-7287/web/Dockerfile
  • server4:/home/jitsi/.jitsi-meet-cfg/web/config.js

References

Weblinks

  1. https://stackoverflow.com/questions/32295168/make-jitsi-meet-work-with-apache-on-a-sub-url

Self-hosted Jitsi Meet

Overview

I set up a self-hosted Jitsi Meet instance, which is of course the video conferencing software. These are the steps I took and additional research options for future use. No custom SELinux rules were necessary, which is a departure from the norm. I guess docker handles the SELinux parts?

Devices

I used these systems.

System OS IP address Role
server1 CentOS 7 10.43.20.155 apache httpd server
server4 CentOS 7 10.44.153.156 docker host
net1 ddwrt 10.43.20.1 ingress for port forwarding

Setting up Jitsi Meet

Installing Meet server

I already had docker and docker-compose installed on server4. Those steps are outside the scope of this document.

Follow the directions from reference 1 which are included here briefly.

Fetch latest release: https://github.com/jitsi/docker-jitsi-meet/releases/latest and do not clone the git repo. I etracted to the home directory of my service account, so use the directory name from the tarball.

Configure a .env file from the env.example file. Mine is included file env.internal. Note that DOCKER_HOST_ADDRESS should point to the public IP address, so the IPv4 address for www.example.com. This attribute is important because groups of 3 and more participants use the server as a central point, rather than the peer-to-peer connection of just 2 participants.

Make directories:

mkdir -p ~/.jitsi-meet-cfg/{web,transcripts,prosody/config,prosody/prosody-plugins-custom,jicofo,jvb,jigasi,jibri}

Start the application.

docker-compose up -d

Open the host firewall on server4.

tf=/usr/lib/firewalld/services/jitsi-meet.xml
sudo touch "${tf}" ; sudo chmod 0644 "${tf}"
cat <<EOF | sudo tee "${tf}" 1>/dev/null
<?xml version="1.0" encoding="utf-8"?>
<service>
  <short>jitsi-meet</short>
  <description>Jitsi Meet is a web conferencing solution. These rules expect a different host to handle encryption.</description>
  <port protocol="tcp" port="8000"/>
  <port protocol="udp" port="10000"/>
</service>
EOF

sudo firewall-cmd --reload
sudo firewall-cmd --permanent --add-service=jitsi-meet
sudo firewall-cmd --reload

Configuring Apache httpd for reverse proxy

Host server1 is the main web server for the Internal network. Modify the main configuration file, /etc/httpd/conf.d/local_mirror.conf with a new virtual host and listen directive.

This snippet depends on ssl-pre being included at the top, and also the relevant included files.

# 5443 is jitsi
Listen *:5443
<VirtualHost *:5443>
   Include conf.d/ssl-common.cnf
   Include conf.d/ssl-5443.cnf
   ProxyPreserveHost On
   <IfModule mod_proxy.c>
      <IfModule mod_proxy_wstunnel.c>
         ProxyTimeout 900
         <Location "/xmpp-websocket">
            ProxyPass "ws://server4:8000/xmpp-websocket"
         </Location>
         <Location "/colibri-ws/">
            ProxyPass "ws://server4:8000/colibri-ws/"
         </Location>
      </IfModule>
   </IfModule>
   Proxypass         /     http://server4:8000/
   ProxypassReverse  /     http://server4:8000/
</VirtualHost>

Modify SELinux rules to allow httpd to listen on port 5443.

sudo semanage port -a -t http_port_t -p tcp 5443

Reload httpd after testing it.

sudo httpd -t
sudo systemctl reload httpd

Open the host firewall on server1. I updated my custom firewall service xml rule and reloaded firewalld.

Configure router

Device net1 is the current edge router for Internal network. Modify the port forwarding rules to include the following:

Application Protocol Port from IP address Port to
jitsi1 Both 5443 10.43.20.155 5443
jitsi2 Both 10000 10.44.153.156 10000

Files involved

  • server4:/home/jitsi/stable-7287.tar.gz
  • server4:/home/jitsi/docker-jitsi-meet-stable-7287/.env
  • server4:/usr/lib/firewalld/services/jitsi-meet.xml
  • server1:/usr/lib/firewalld/services/http-internal.xml
  • server1:/etc/httpd/conf.d/local_mirror.conf

References

Weblinks

  1. https://jitsi.github.io/handbook/docs/devops-guide/devops-guide-docker/

Other

Original research

Convert .dng to .jpg

I had a batch of .dng files that should be converted to .jpg format. I tried a few ways, but they did not preserve all the exif metadata. My process documented below does.

  1. Use Irfanview to batch convert all .dng files to .jpg. This will strip a lot of the metadata.

  2. Add in metadata from original file.

    time for word in *dng ; do exiftool -all= -tagsfromfile "${word}" -exif:all "${word%%.dng}.jpg" ; done

This command syntax is verbatim from the man page for exiftool.

  1. Apply original timestamp.

    for word in *dng ; do touch --no-create --reference "${word}" "${word%%dng}jpg" ; done

  2. Optionall, remove the original files.

    rm $( for word in *.jpg ; do echo "${word%%.jpg}.dng" ; done ; )

References

Man pages

  1. exiftool(1p)

Kerberos auth for my cgit project

I finally solidified my Kerberos authentication for my cgit solution. I recently added ldap auth, and now we have the real authentication solution available (at least according to Kerberos people).

My relevant snippets of my apache config file are the following.

SetEnv GIT_PROJECT_ROOT /var/www/git
SetEnv GIT_HTTP_EXPORT_ALL
SetEnv REMOTE_USER=$REDIRECT_REMOTE_USER
SetEnv GITWEB_CONFIG /etc/gitweb.conf
# This file will not work when it is in /usr/sbin.
ScriptAlias /git/ /usr/libexec/git-core/git-http-backend-mersey/
<Directory "/usr/libexec/git-core*">
   Options +ExecCGI +Indexes
   Order allow,deny
   Allow from all
   Require all granted
</Directory>
# a2enmod macro
<Macro Project $repository $rwstring $rostring>
   <LocationMatch "^/git/$repository.*$">
      AuthName "Git Access"
      Include conf.d/auth-gssapi.cnf
      #AuthUserFile /etc/git_access
      Require $rwstring
      Require $rostring
   </LocationMatch>
   <LocationMatch "^/git/$repository/git-receive-pack$">
      AuthName "Git Access"
      Include conf.d/auth-gssapi.cnf
      #AuthUserFile /etc/git_access
      Require $rwstring
   </LocationMatch>
</Macro>
# Protect everything under git directory...
<Directory "/var/www/git">
   Require all denied
</Directory>
# ...Unless given permissions in this file.
Include /etc/git_access.conf
# cgit
# https://ic3man5.wordpress.com/2013/01/26/installing-cgit-on-debian/
# depends on confs-enabled/cgit.conf
<Directory "/usr/share/cgit/">
   SetEnv CGIT_CONFIG /etc/cgitrc
   SetEnv GIT_URL cgit
   AllowOverride all
   Options +ExecCGI +FollowSymLinks +Indexes
   DirectoryIndex cgit.cgi
   AddHandler cgi-script .cgi
   RewriteCond %{REQUEST_FILENAME} !-f
   RewriteCond %{REQUEST_FILENAME} !-d
   RewriteRule (.*) /cgit/cgit.cgi/$1 [END,QSA]
</Directory>

Here is the separate include file, auth-gssapi.conf.

# File: /etc/httpd/conf.d/auth.cnf
# Startdate: 2022-06-13 14:10
# Usage: included by main config file in a few places
# History:
# Reference:
#    auth-ldap.cnf
AuthType GSSAPI
GssapiUseSessions On
Session On
SessionCookieName s1_session path=/;
GssapiCredStore keytab:/etc/httpd/keytab
GssapiCredStore ccache:/etc/httpd/krb5.cache               
SessionHeader S1SESSION
GssapiSessionKey file:/etc/httpd/gssapisession.key
GssapiImpersonate On
GssapiDelegCcacheDir /run/httpd/ccache
GssapiDelegCcachePerms mode:0660 gid:apache
GssapiUseS4U2Proxy On
GssapiAllowedMech krb5
GssapiBasicAuth On
GssapiBasicAuthMech krb5
GssapiLocalName On

Some preparation of the file system is required too, of course.

sudo yum install mod_auth_gssapi mod_session
sudo su -
# the rest as root
kinit -kt /etc/krb5.keytab
# I already have an existing ipa service for HTTP/server1.
ipa-getkeytab -p HTTP/server1.ipa.internal.com -k /etc/httpd.keytab
sudo kinit -k -t /etc/httpd.keytab -c /etc/httpd.cache HTTP/server1.ipa.internal.com
sudo chown apache /etc/httpd.keytab ; sudo chmod 0600 /etc/httpd.keytab
sudo mkdir -p /run/httpd/ccache ; sudo chown apache /run/httpd/ccache
sudo chown apache /etc/httpd.cache

Test apache and if its configuration is OK, reload it!

sudo httpd -t
sudo systemctl reload httpd

And now, on my git client, I can clear the credential cache

git credential-cache exit

Ensure that the effective git config includes:

[http]
emptyAuth = true

Which I can set with:

git config --global http.emptyAuth true

And ensure I have a kerberos ticket.

kinit

And then I can push to my remote.

$ git remote add server1 https://server1.ipa.example.com/git/mbbmlib
$ git push server1
Enumerating objects: 3, done.
Counting objects: 100% (3/3), done.
Compressing objects: 100% (2/2), done.
Writing objects: 100% (2/2), 229 bytes | 229.00 KiB/s, done.
Total 2 (delta 1), reused 0 (delta 0), pack-reused 0
To https://server1.ipa.internal.com/git/mbbmlib
   e0767c5..3a3c4d9  samplebranch -> samplebranch

I don't normally use my internal server name for my git remotes, but it's worth it if it can take advantage of the kerberos tickets I already use for auth to the system anyway!

Update 2023-06-18

I used this reference: https://stackoverflow.com/questions/29095389/git-push-to-https-repository-from-intranet-application-with-kerberos-authenticat